![]()
Introduction:
 Click
for full size picture looking down into the pit.
Click
for full size picture looking down into the pit.
 Click
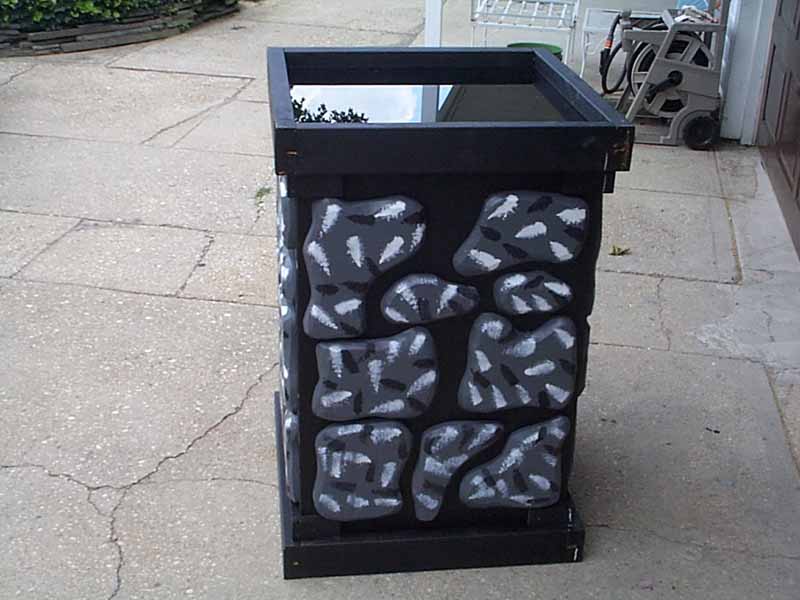
for full size picture of the completed unit.
Click
for full size picture of the completed unit. Click
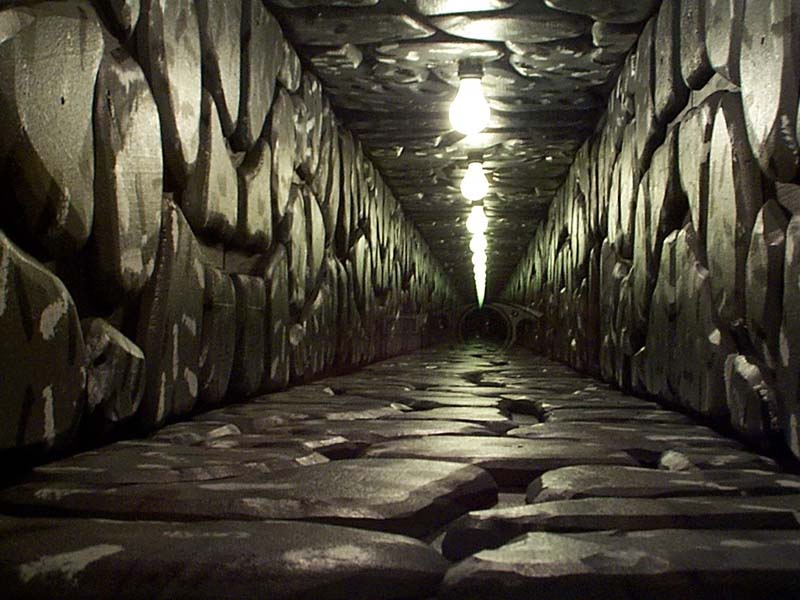
for full size picture of the 3 components. You look into the
pit, and it appears to have no bottom. As you look deep into the pit you hear
the faint voice of a child asking for help. The child has fallen into the pit
and cannot get out. While this is a very old illusion, I have never seen
detailed construction information on the subject. As I constructed mine, I took
pictures and notes and I will attempt to give this information along with
pictures of the effect and its construction.
Click
for full size picture of the 3 components. You look into the
pit, and it appears to have no bottom. As you look deep into the pit you hear
the faint voice of a child asking for help. The child has fallen into the pit
and cannot get out. While this is a very old illusion, I have never seen
detailed construction information on the subject. As I constructed mine, I took
pictures and notes and I will attempt to give this information along with
pictures of the effect and its construction.Effect:
This effect is accomplished with 2 mirrored surfaces
reflecting each other.
You have probably experienced this in a barbershop or some other place that has
mirrors facing each other.
I used 2 pieces of glass, One was a regular mirror and the other a see through or
2-way mirror as you see in the police station shows on TV.
You can see through one side but if you're on the reverse side the glass becomes a
mirror. The method of construction allows you to take it apart easily for
storage.
Preparing the 2x4's to receive the mirrors:
Now to assemble the mirror housing:
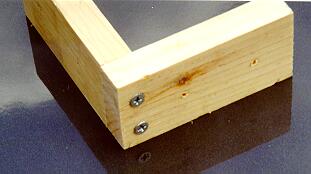
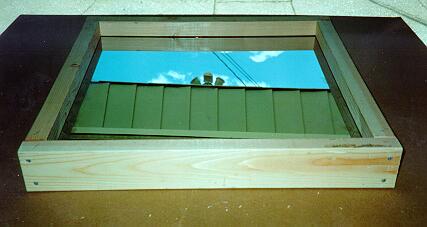 Click
for full size picture. Square 2 23" pieces to the inside edge of one of
the 25 5/8" pieces with the groove to the inside and all pieces facing up.
Use screws to attach the 25 5/8" pieces. Slide the mirror into the slots
with the mirrored side up. Now screw the last end piece to the two 25 5/8"
pieces. Make sure everything is square. Repeat the process for the 2-way mirror
making sure the mirrored side is facing down. This is important, mark each
corner with a number 1-4T for top and 1-4B for bottom. You will be taking the
assembly apart for painting and it is best to put it back together the same way
it was taken apart. Of course when you do get to painting, make sure you remark
them as before. I also added a 3/8" piece of plywood to the very
bottom of the unit for protection of the bottom glass. 4 screws hold it in
place.
Click
for full size picture. Square 2 23" pieces to the inside edge of one of
the 25 5/8" pieces with the groove to the inside and all pieces facing up.
Use screws to attach the 25 5/8" pieces. Slide the mirror into the slots
with the mirrored side up. Now screw the last end piece to the two 25 5/8"
pieces. Make sure everything is square. Repeat the process for the 2-way mirror
making sure the mirrored side is facing down. This is important, mark each
corner with a number 1-4T for top and 1-4B for bottom. You will be taking the
assembly apart for painting and it is best to put it back together the same way
it was taken apart. Of course when you do get to painting, make sure you remark
them as before. I also added a 3/8" piece of plywood to the very
bottom of the unit for protection of the bottom glass. 4 screws hold it in
place.
Now for the walls:
 Click
for full size picture of an inner wall. When you pick up your 4x8 3/8 CDX
piece of plywood, you might as well get it cut to size. My home Depot makes cuts
for 50 cents a cut but usually never charges for it at the register. Even if
they do, it is cheap enough. You just have to insure that your dimensions are
perfectly correct. I made my walls 3' high and am quite satisfied with that
dimension. Then have them cut the 4x8' sheet lengthwise to the width of the
inside of one dimension of the 2x4" frame. T hen on the remaining piece cut
lengthwise to the other dimension subtracting 2 times the width (3/8) of the
wall thickness. That is 2 cuts ($1.00). Now have them cut the 2 long pieces into
the height of the walls. If you make your walls 3' high, that is 4 cuts ($2.00).
I painted the walls a flat black before attaching the faux stones.
Click
for full size picture of an inner wall. When you pick up your 4x8 3/8 CDX
piece of plywood, you might as well get it cut to size. My home Depot makes cuts
for 50 cents a cut but usually never charges for it at the register. Even if
they do, it is cheap enough. You just have to insure that your dimensions are
perfectly correct. I made my walls 3' high and am quite satisfied with that
dimension. Then have them cut the 4x8' sheet lengthwise to the width of the
inside of one dimension of the 2x4" frame. T hen on the remaining piece cut
lengthwise to the other dimension subtracting 2 times the width (3/8) of the
wall thickness. That is 2 cuts ($1.00). Now have them cut the 2 long pieces into
the height of the walls. If you make your walls 3' high, that is 4 cuts ($2.00).
I painted the walls a flat black before attaching the faux stones.Attaching Brackets:
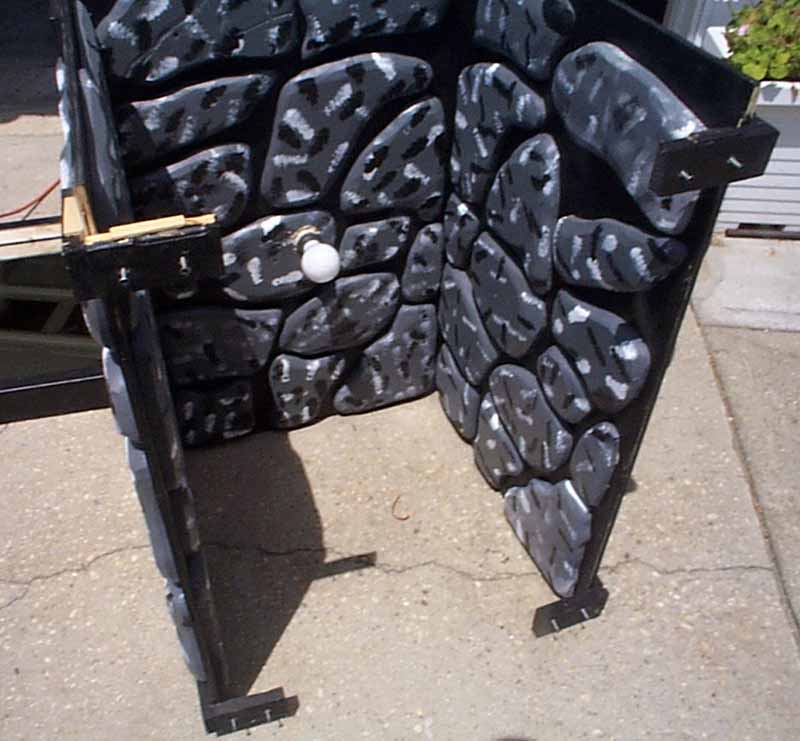
 Click
for full size picture of an attaching bracket.
Click
for full size picture of an attaching bracket. Click
for full size picture of the brackets mounted. To hold the sides together I
used short lengths of 1x2 pine. Cut 16 pieces about six inches long. This will
make up the 8 brackets for each corner of the top and bottom. Put a dab of
waterproof glue on the end of one piece and form an "L" shaped bracket
with another piece. Do this for all 8 brackets. After the glue dries, pre-drill
and put a couple of screws in for strength. Now lay the assembled mirrored
bottom on the floor and place one of the exact fit sides of the wall to the
inside of the 2x4 frame. Have someone hold it in place and glue and screw one of
the brackets on the wall so that the bracket rests on the top surface of the
2x4. Repeat for the other side. Mark the wall so it can be placed back into the
same position on the 2x4 base. Now repeat the procedure for the opposite side
wall. Now put both bracketed walls back in the base and slide in one of the
remaining side walls. This wall should fit between the other 2 walls. Now put 2
screws (no glue) through the bracket into the side wall. Repeat this procedure
for the remaining side. Then do the same for the remaining wall. Repeat this
whole procedure for the top, making sure that the bracket is flush with the
bottom of the top 2x4.
Click
for full size picture of the brackets mounted. To hold the sides together I
used short lengths of 1x2 pine. Cut 16 pieces about six inches long. This will
make up the 8 brackets for each corner of the top and bottom. Put a dab of
waterproof glue on the end of one piece and form an "L" shaped bracket
with another piece. Do this for all 8 brackets. After the glue dries, pre-drill
and put a couple of screws in for strength. Now lay the assembled mirrored
bottom on the floor and place one of the exact fit sides of the wall to the
inside of the 2x4 frame. Have someone hold it in place and glue and screw one of
the brackets on the wall so that the bracket rests on the top surface of the
2x4. Repeat for the other side. Mark the wall so it can be placed back into the
same position on the 2x4 base. Now repeat the procedure for the opposite side
wall. Now put both bracketed walls back in the base and slide in one of the
remaining side walls. This wall should fit between the other 2 walls. Now put 2
screws (no glue) through the bracket into the side wall. Repeat this procedure
for the remaining side. Then do the same for the remaining wall. Repeat this
whole procedure for the top, making sure that the bracket is flush with the
bottom of the top 2x4.
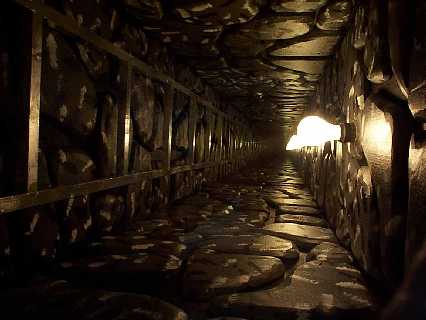
Installing the light:
 Click
for full size picture of the installed light. On one side wall, measure to
the exact center and drill a hole large enough to install the pigtail wires from
a light bulb socket.
Click
for full size picture of the installed light. On one side wall, measure to
the exact center and drill a hole large enough to install the pigtail wires from
a light bulb socket.
Aligning the illusion:
Assemble the unit and plug in the light. Look down into the pit and check the alignment of the lights. Hopefully they will appear to go straight down. If they are off, you will have to install shims on the top of the upper brackets to align everything. Use some thin wood stock like a paint stirrer or whatever. Once it is aligned, glue the shims in place.Making the stone walls:
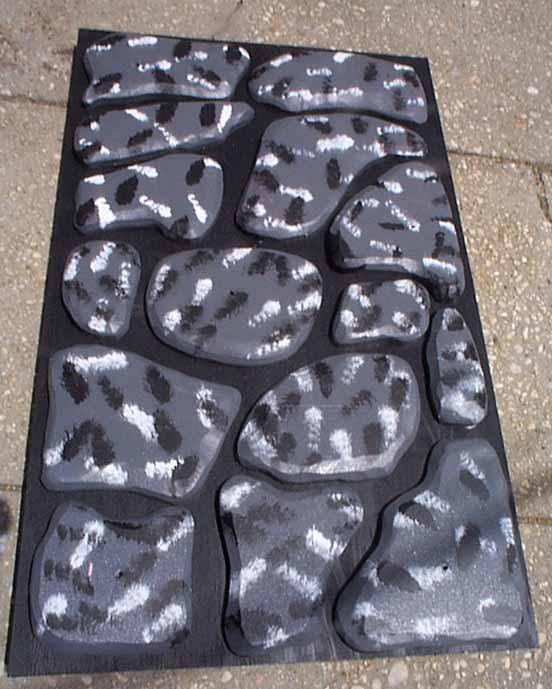
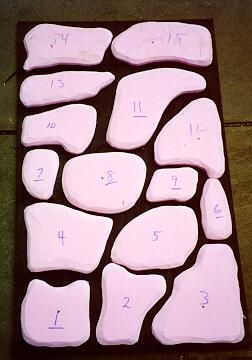 Click
for full size picture of the numbered stones. Measure one side wall, the
walls should all be almost the same size. Transfer the measurements to the 2x8
sheet of pink foam and with a magic marker draw about 15-20 random stones on the
foam. Number each stone starting with the lower left and going to the top. Cut
all 4 pieces of foam to the same size. I attached all 4 pieces of foam together
and cut out the stones on my band saw. After cutting, I marked front and back of
each piece with their numbers. I have a bench sander and I sanded the edge of
each piece to simulate a stone. Paint the stones to your liking, I used gray
paint with splashes of white and black. I'm sure it can be done better, but it
looks good in the final effect. Remember to use latex paint, otherwise solvents
may melt the foam. I used liquid nails construction adhesive to attach the
stones to the inside walls. If you want, you can repeat the procedure for the
outside walls, but if I had to do over again I wouldn't do the outside, too much
work.
Click
for full size picture of the numbered stones. Measure one side wall, the
walls should all be almost the same size. Transfer the measurements to the 2x8
sheet of pink foam and with a magic marker draw about 15-20 random stones on the
foam. Number each stone starting with the lower left and going to the top. Cut
all 4 pieces of foam to the same size. I attached all 4 pieces of foam together
and cut out the stones on my band saw. After cutting, I marked front and back of
each piece with their numbers. I have a bench sander and I sanded the edge of
each piece to simulate a stone. Paint the stones to your liking, I used gray
paint with splashes of white and black. I'm sure it can be done better, but it
looks good in the final effect. Remember to use latex paint, otherwise solvents
may melt the foam. I used liquid nails construction adhesive to attach the
stones to the inside walls. If you want, you can repeat the procedure for the
outside walls, but if I had to do over again I wouldn't do the outside, too much
work.
Adding sound:
I picked up a small radio with a tape deck for $5 at a garage sale. Get a 30-second loop tape from radio shack or some other source. Have a child record a help message on the loop tape. This is just one way to do it. Conceal the recorder at the base of the pit.Some tips:
À People have a tendency to lean on the 2x4 top when they look into the pit. You might want to build a second "leaning" structure around the pit. If any of you have any suggestions e-mail me.
À I was thinking of mounting the effect at about a 45-degree angle on the grass and using bales of hay to conceal the bottom of the pit. This way, you can construct a fence to keep people from getting to close to the glass.
À Since the top and bottom are easily removed from the side walls, I was thinking of running some temporary 2x2 straps from the top 2x4 to the bottom 2x4 to tie the unit together. I also did this.
À One of my grandsons (Joey) suggested putting a piece of Plexiglas over the top of the unit to keep dirt off it and also protect the top mirror. This I did and it works fine.
Material list:
Tools needed to build it:
I recently added a ladder on the inside.
 Click
for full size picture.
Click
for full size picture.
Here are comments I have
received from people who have built this project:
Much like Titlemax reviews online, comments and reviews can be a great help when embarking on a new Halloween project.
=====================================
From "Scott Robinson."
Just finished a version of your pit. The problem that I had was that the
cheapest I could find a 2x2 piece of 2-way mirror was about $70. That put the
project right out of budget. Here's what I did: I bought a scrap piece of
1/4" 2x2 plexi from Hechingers ($3.00) and bought some mirrored window tint
("Mirror Tint" by Secret Zone) at Pep Boys auto store ($14.00). I
applied the tint to the plexi and viola! It works great, and solves the problem
of TOTs breaking the glass! You may consider this as a cheap and safe
alternative to the 2-way mirror. Thanx again for your wonderful project ideas!
![]()
![]()
![]()
|
Last Modified January 2023 |